Agent Zone
The Agent Zone curates Agents for vertical scenarios that cover high-frequency use cases — select one and start using it right away. Here you can manage the Agents you have enabled, or go to the Agent Marketplace to pick the AI Agent that fits you.
How to open it: In the left navigation, under the Tools & Marketplace group, click Agent Zone. The Agent Zone has two tabs: My Agents and Agent Marketplace.
My Agents
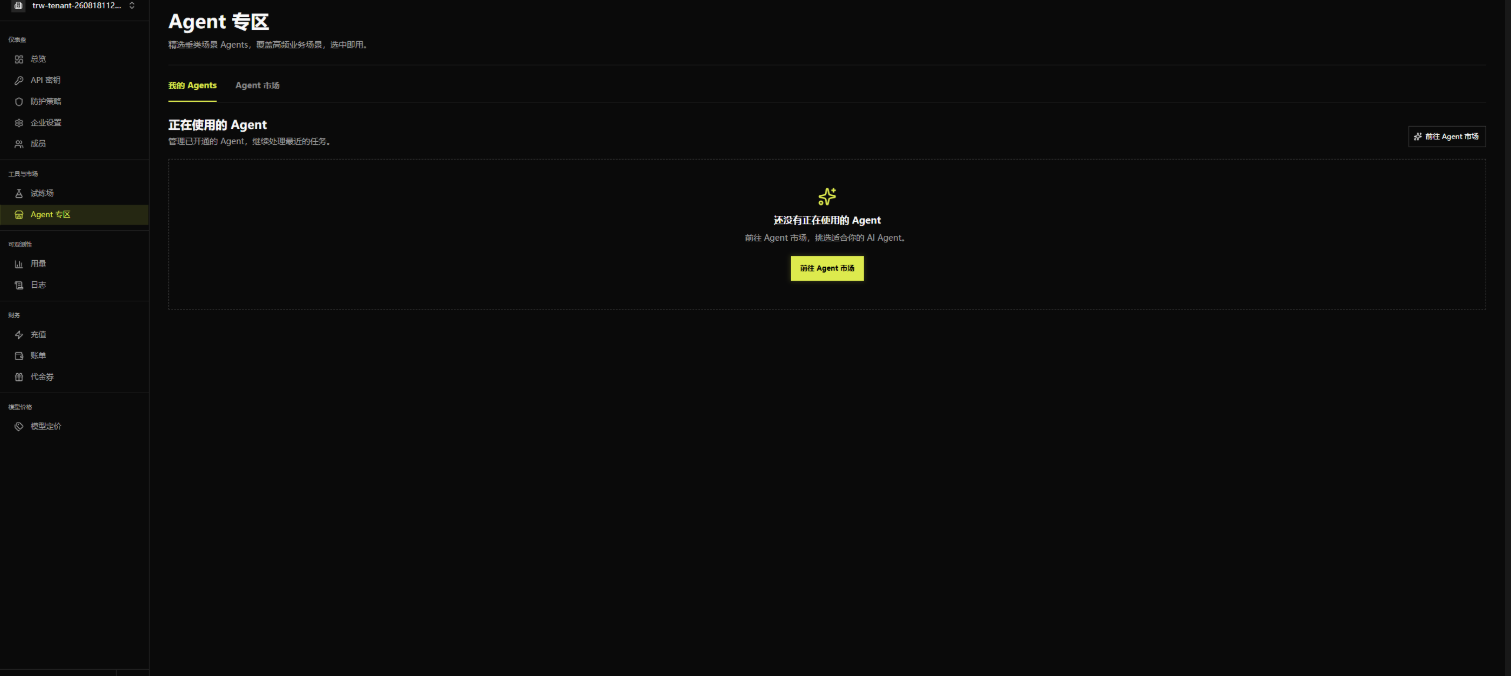
The My Agents tab lets you manage the Agents you have enabled and continue with recent tasks. On first visit the list is empty and shows the prompt “You don’t have any Agents in use yet.”
Steps:
- Click the Go to Agent Marketplace button in the center of the page (or the button of the same name in the top-right corner).
- The system switches to the Agent Marketplace tab where you can start picking an Agent.

Agent Marketplace
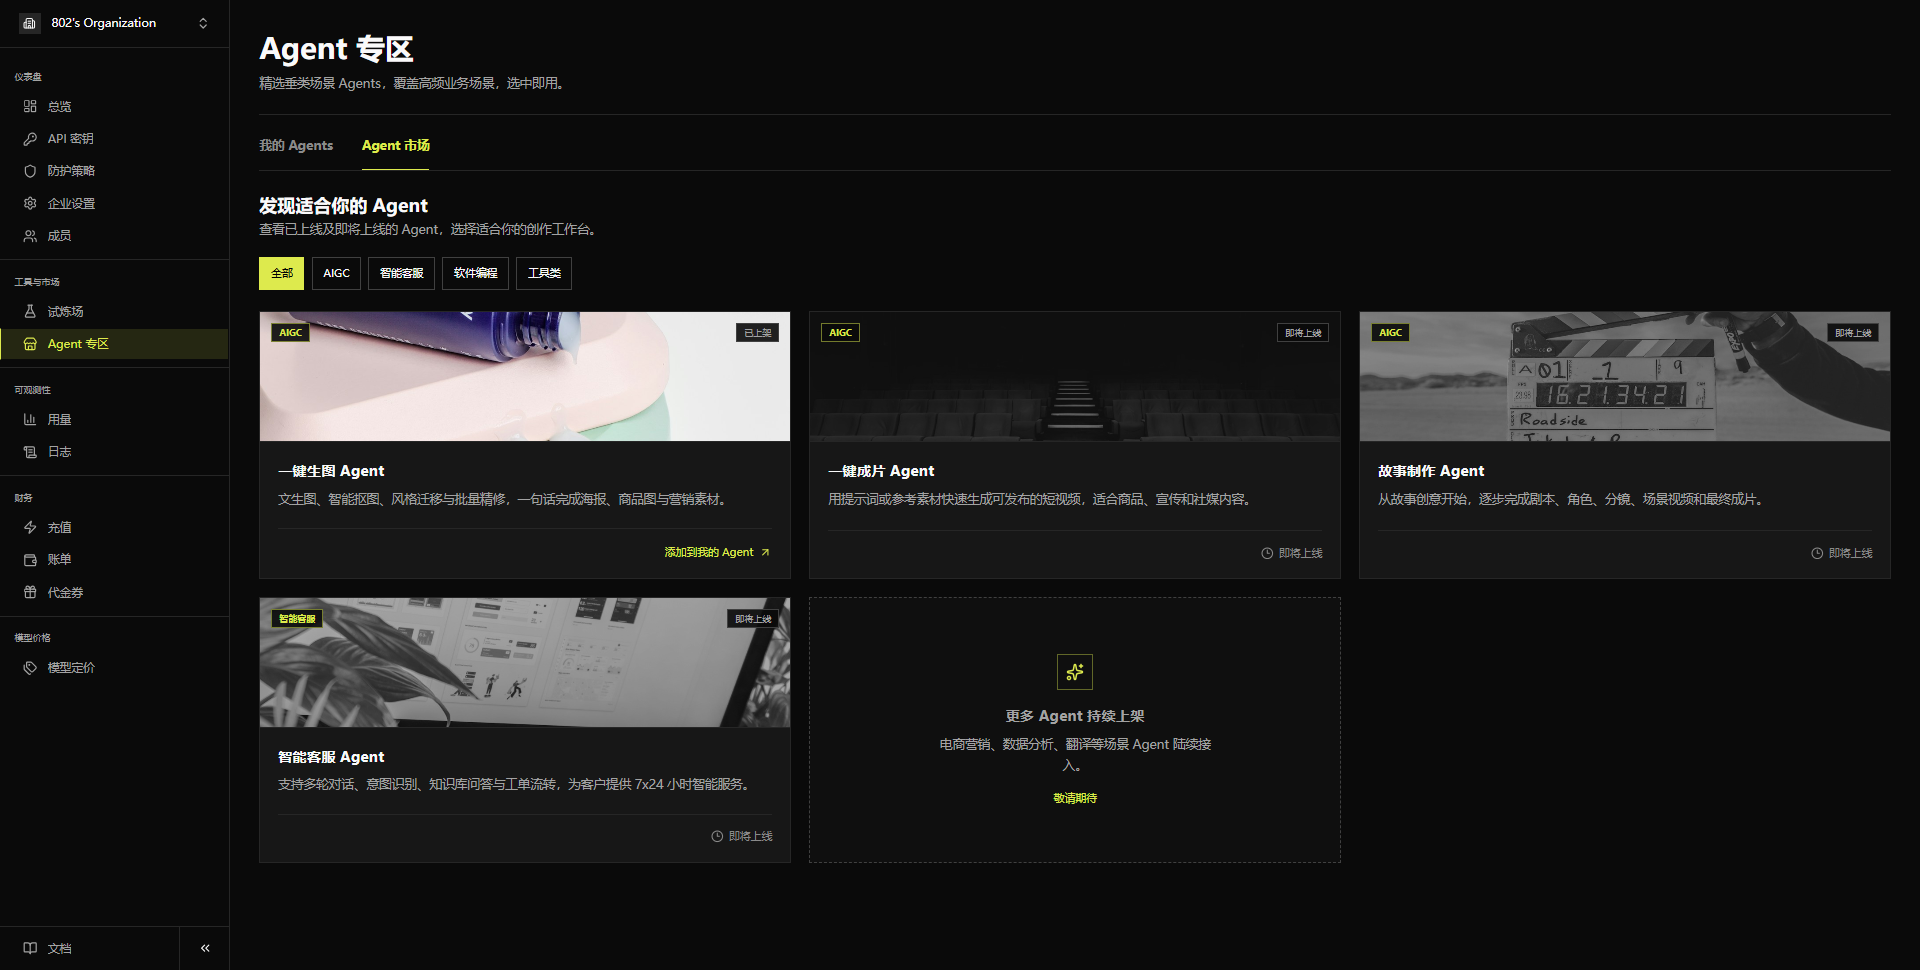
The Agent Marketplace tab helps you discover the Agents that suit you, view Agents that are already live or coming soon, and choose the right creative workbench.
Category filter: Category tags at the top let you filter as needed: All (selected by default) / AIGC / Smart Customer Service / Software Development / Utilities.
Agent cards:
At the bottom, More Agents are on the way — e-commerce marketing, data analytics, translation, and other scenario Agents are being added.
Steps:
- (Optional) Use the category tags at the top to filter the Agent type you want.
- Find an Agent whose status is Published (such as the Text-to-Image Agent).
- Click the Add to My Agents link in the bottom-right corner of the card.
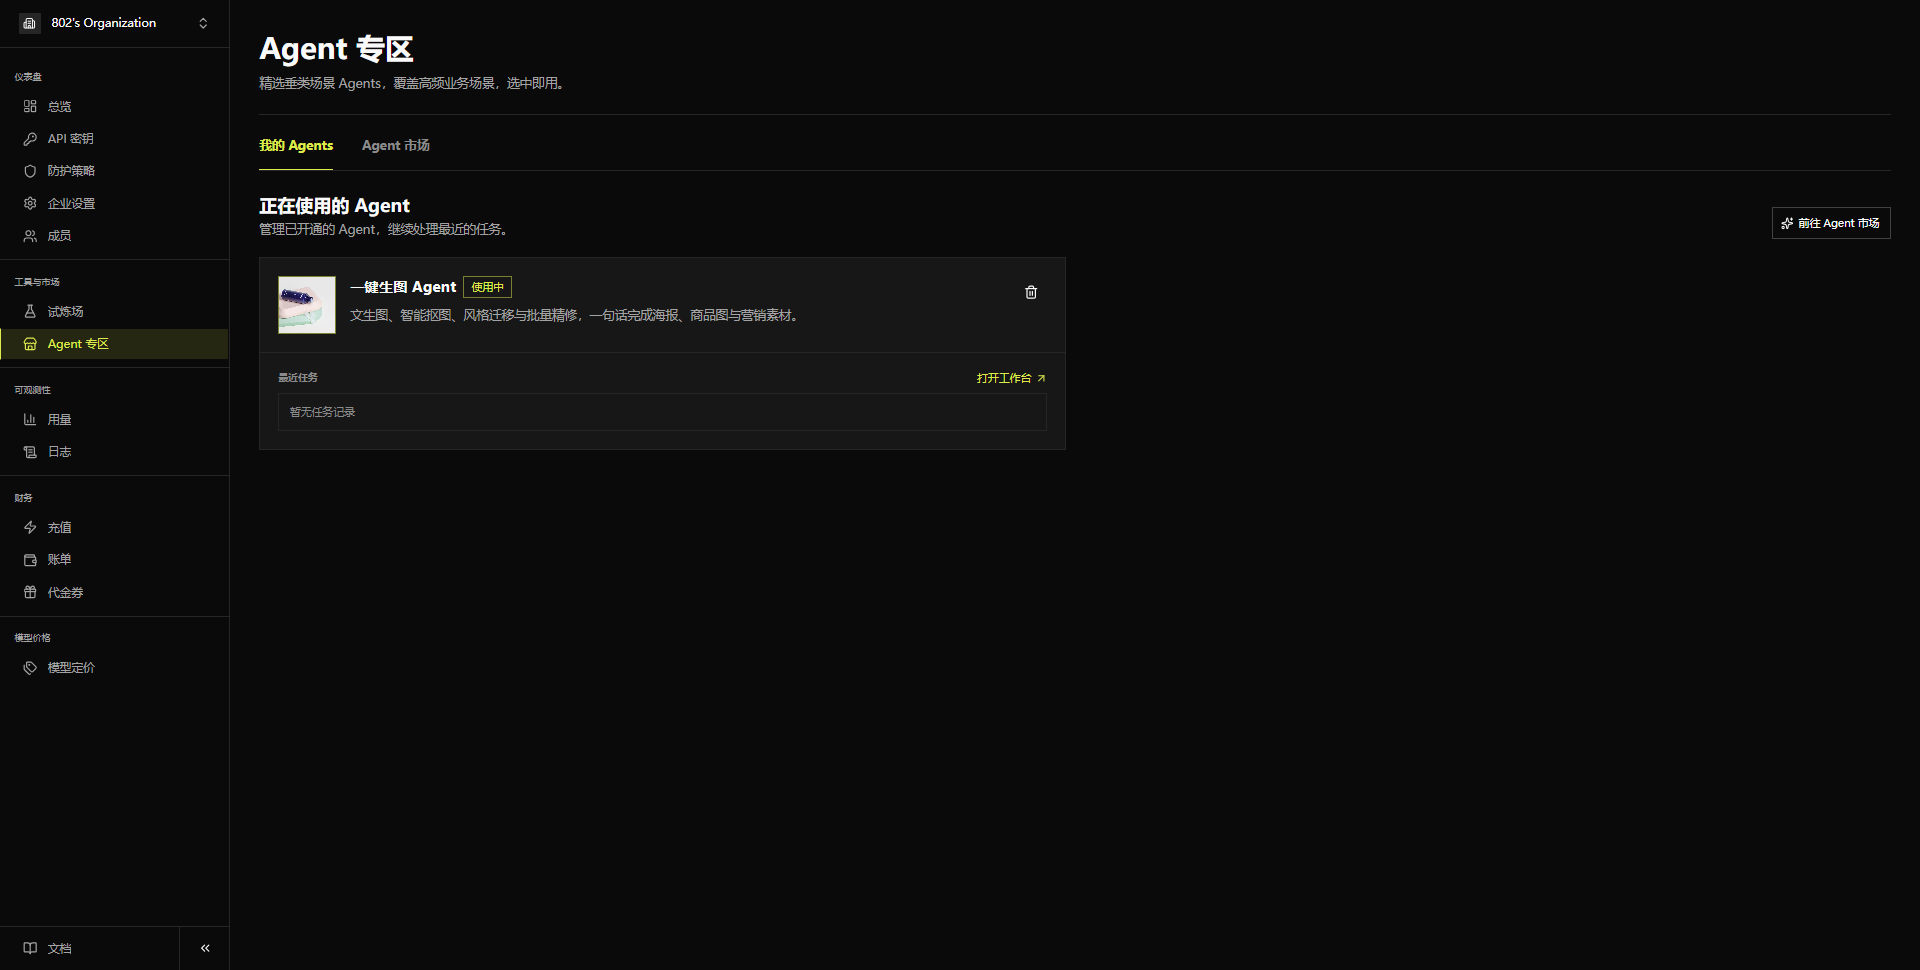
- Once added, the Agent appears under My Agents and is ready to use.
Note: Agents with the “Coming Soon” status cannot be added yet; their card shows “Coming Soon” in the bottom-right corner.


Using the Text-to-Image Agent
Step 1: Configure your API Key (required on first use)
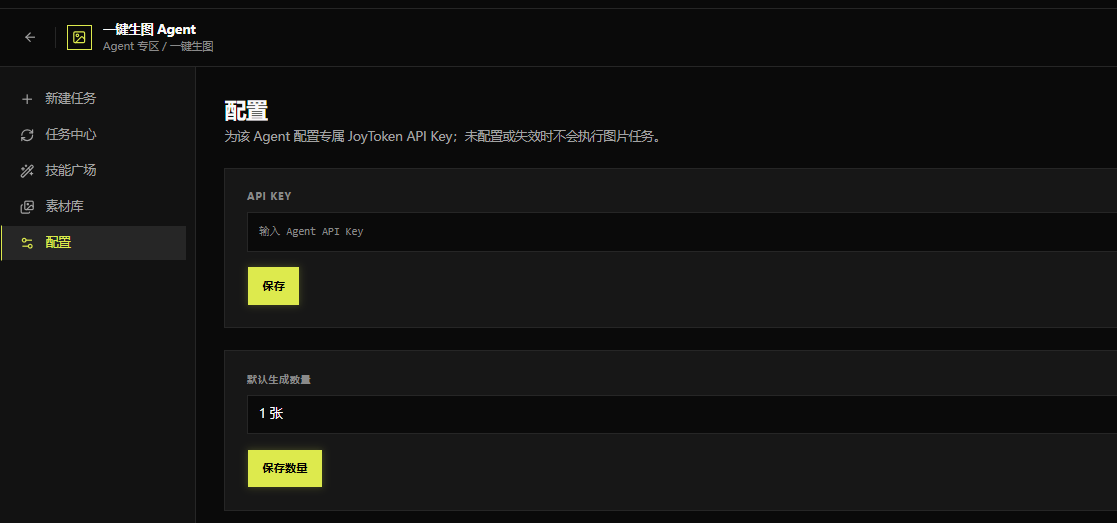
Open Configuration in the left navigation.
- Configure the API KEY: Enter your API Key in the “API KEY” field. When already configured, the field shows a masked value, for example “Configured (last four: f9e4).” Click the eye icon on the right to toggle show/hide of the Key. Click Save to complete the API Key configuration.
- Set the default number of images (optional): Choose the default count per generation in the “Default count” dropdown (e.g., 1 image), then click Save count to store the default.

Step 2: Create a generation task
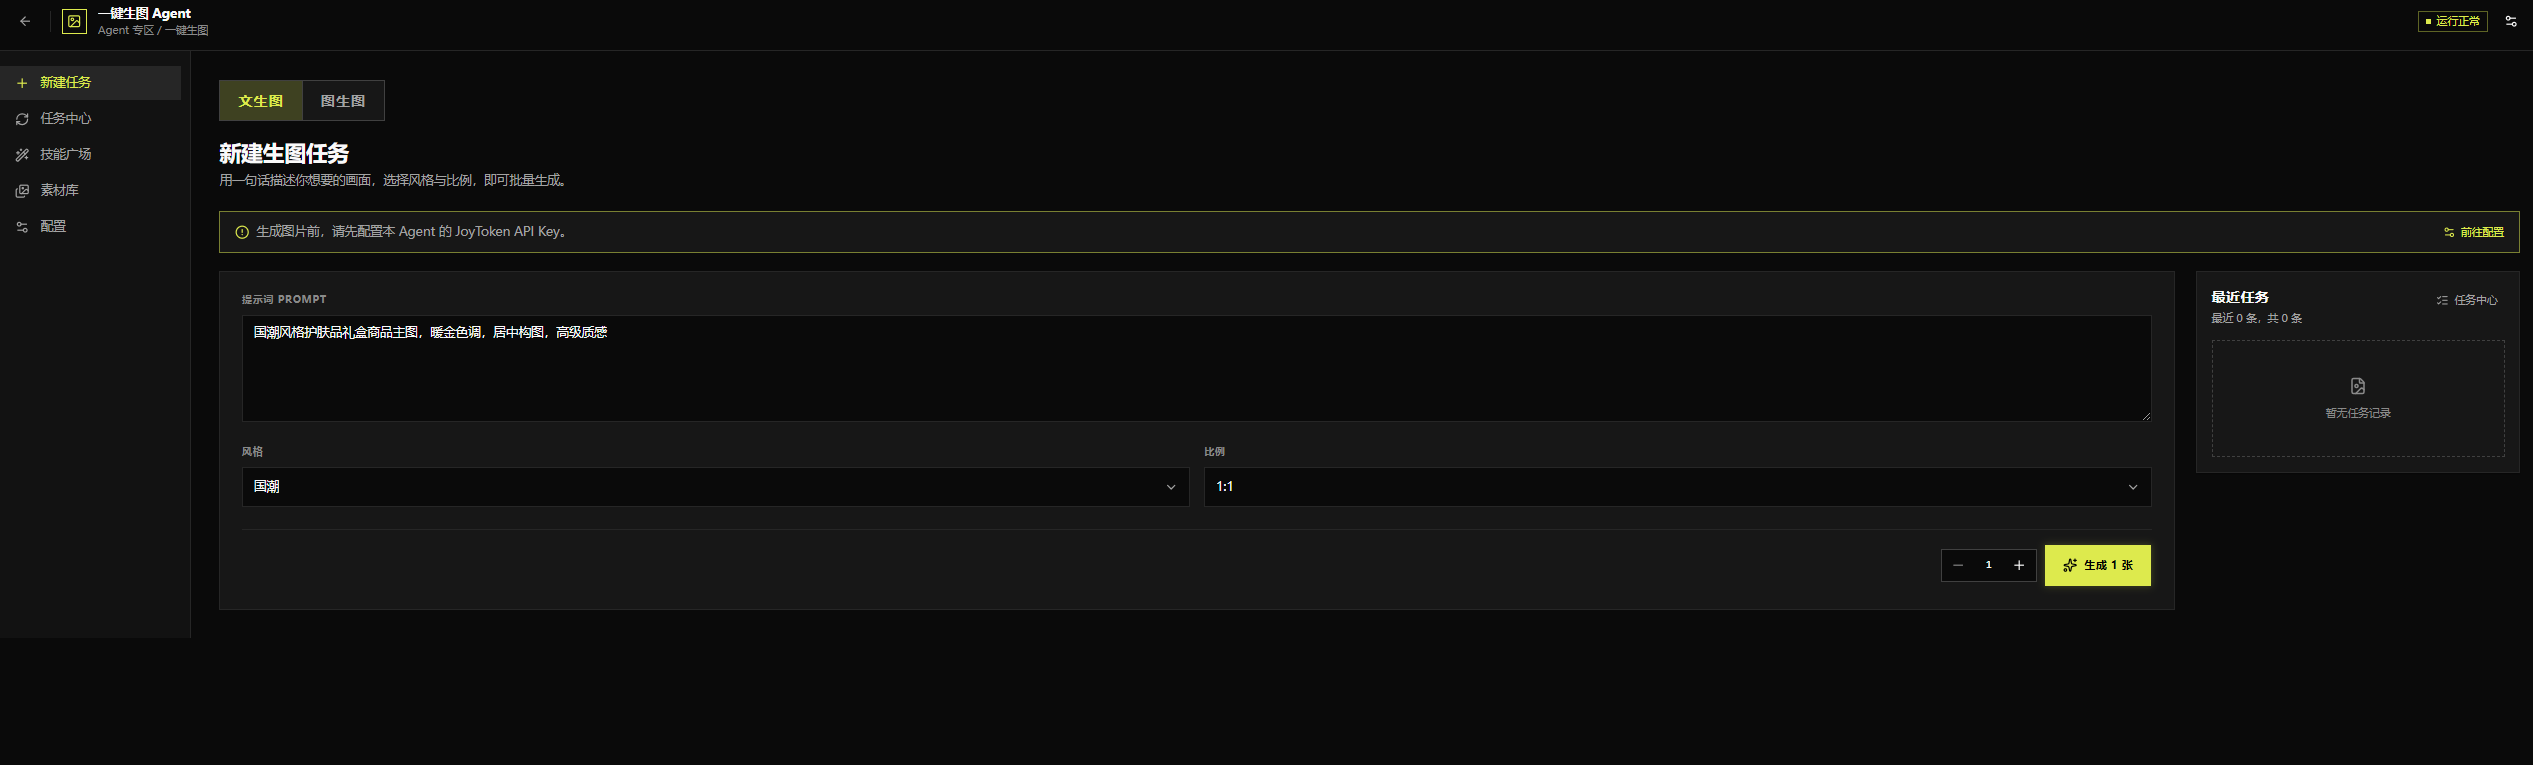
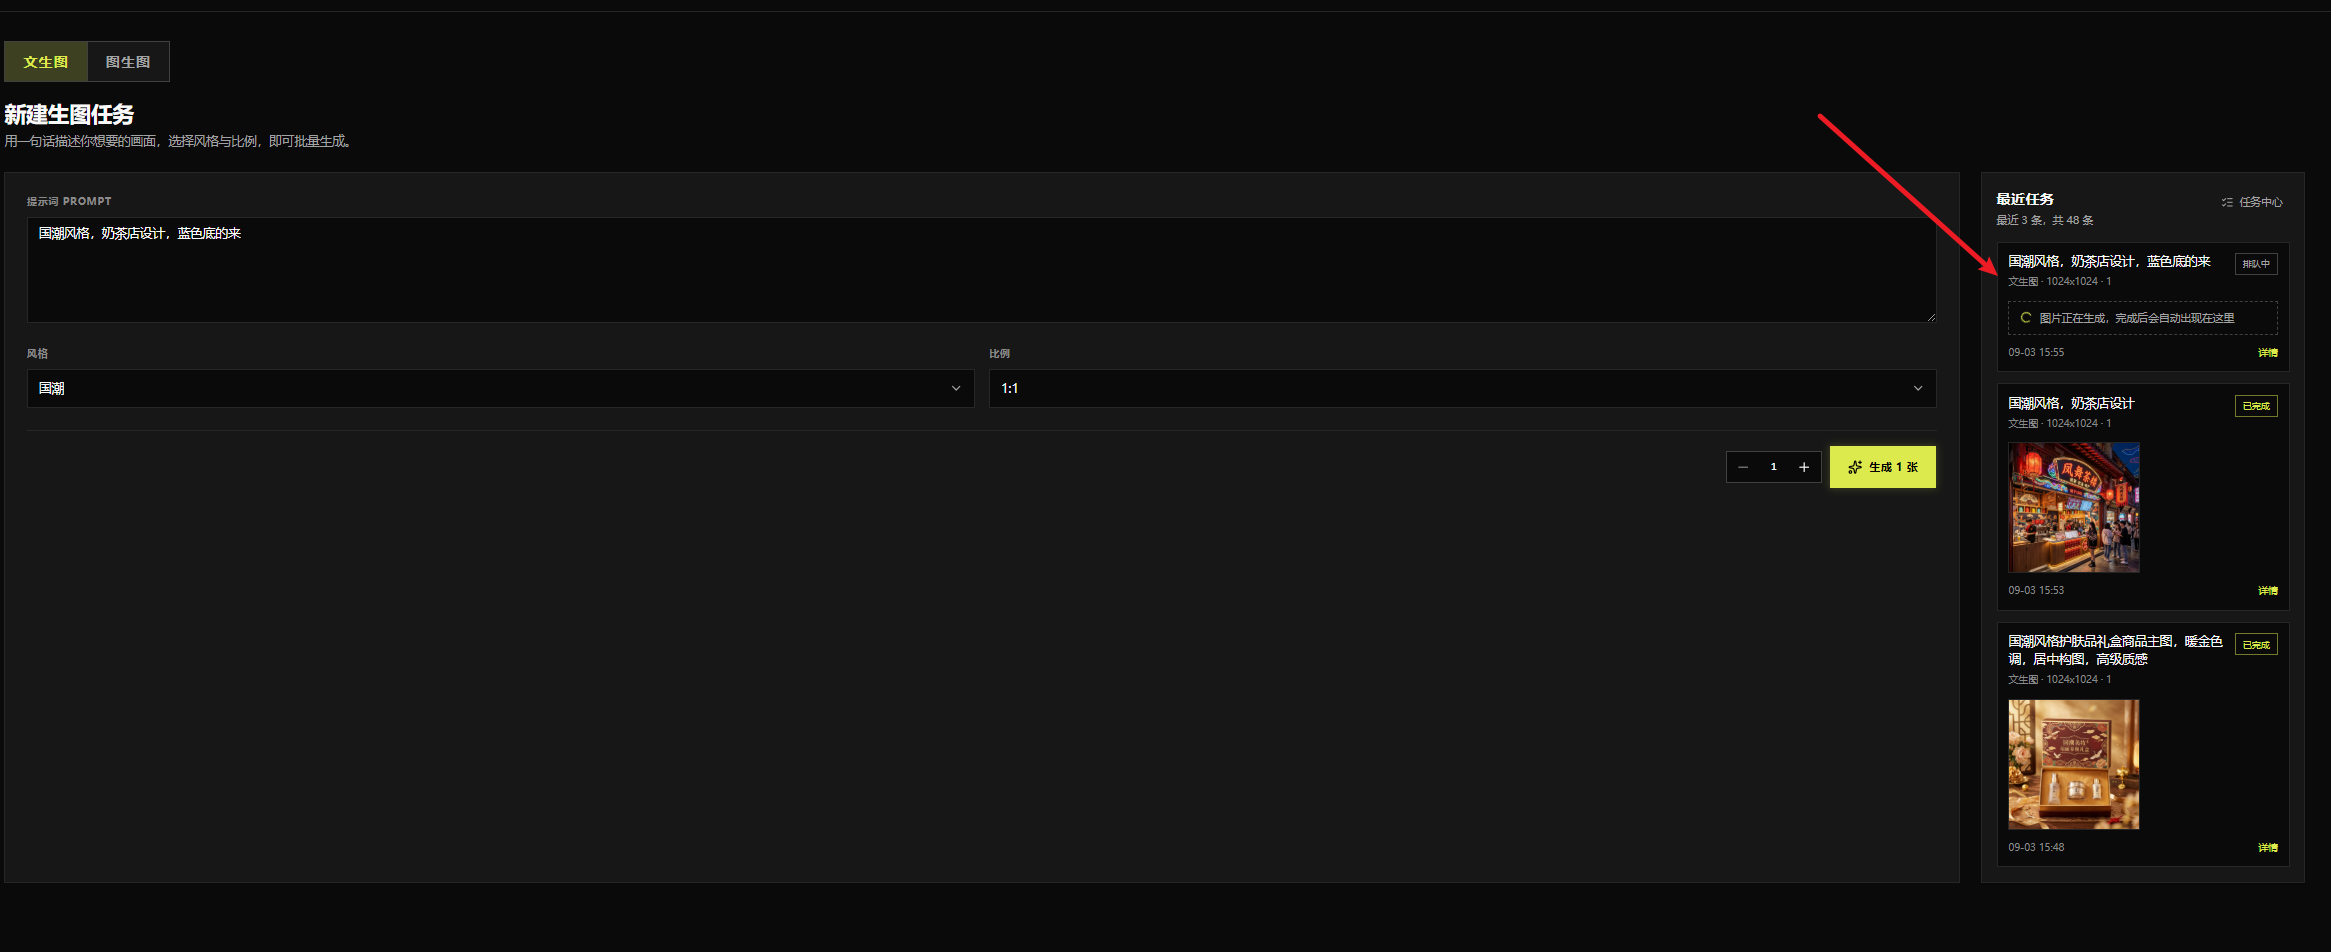
After configuration, click New Task in the left navigation; it opens the Text-to-Image mode by default. Follow these steps to generate images:
- Enter the PROMPT — describe the image you want in a single sentence (with an example placeholder).
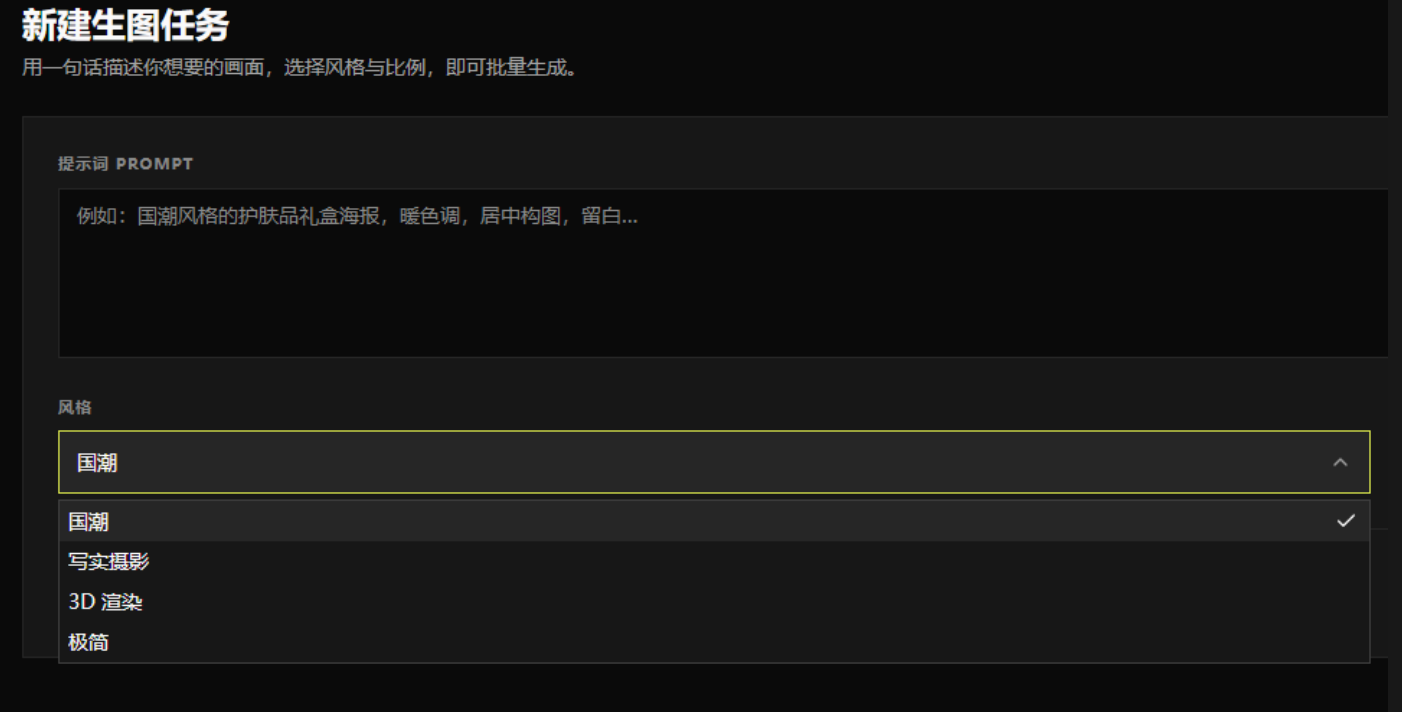
- Select a style — Guochao / Realistic Photography / 3D Render / Minimalist.
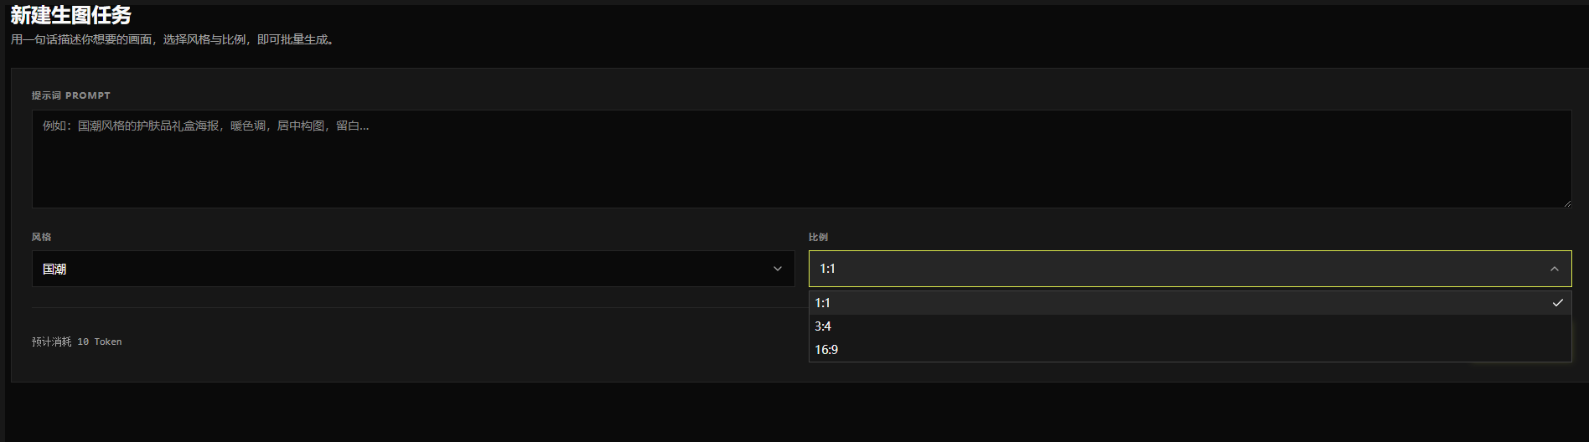
- Select an aspect ratio — 1:1 / 3:4 / 16:9.
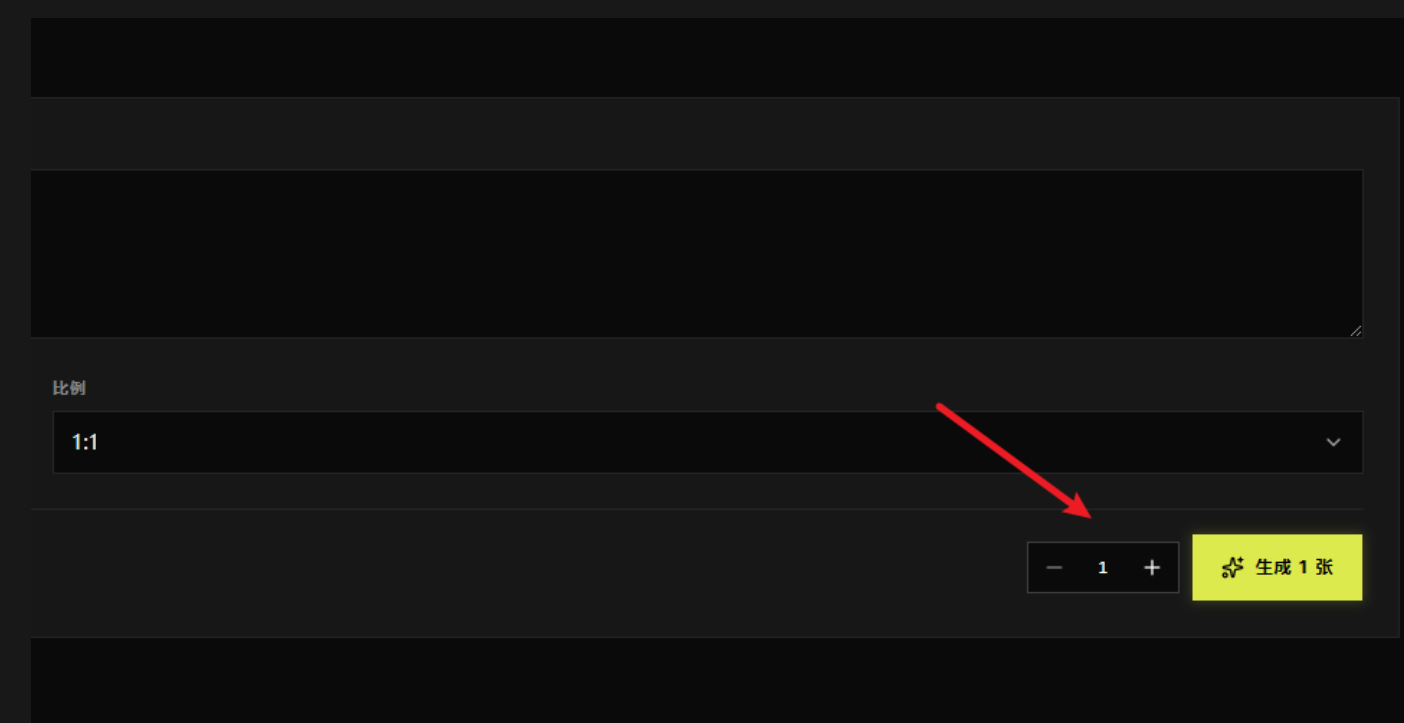
- Select the number of images — adjust with −/+; the estimated Token cost appears at the bottom-left. Click Generate N images to submit; results appear in the Recent Tasks panel on the right.


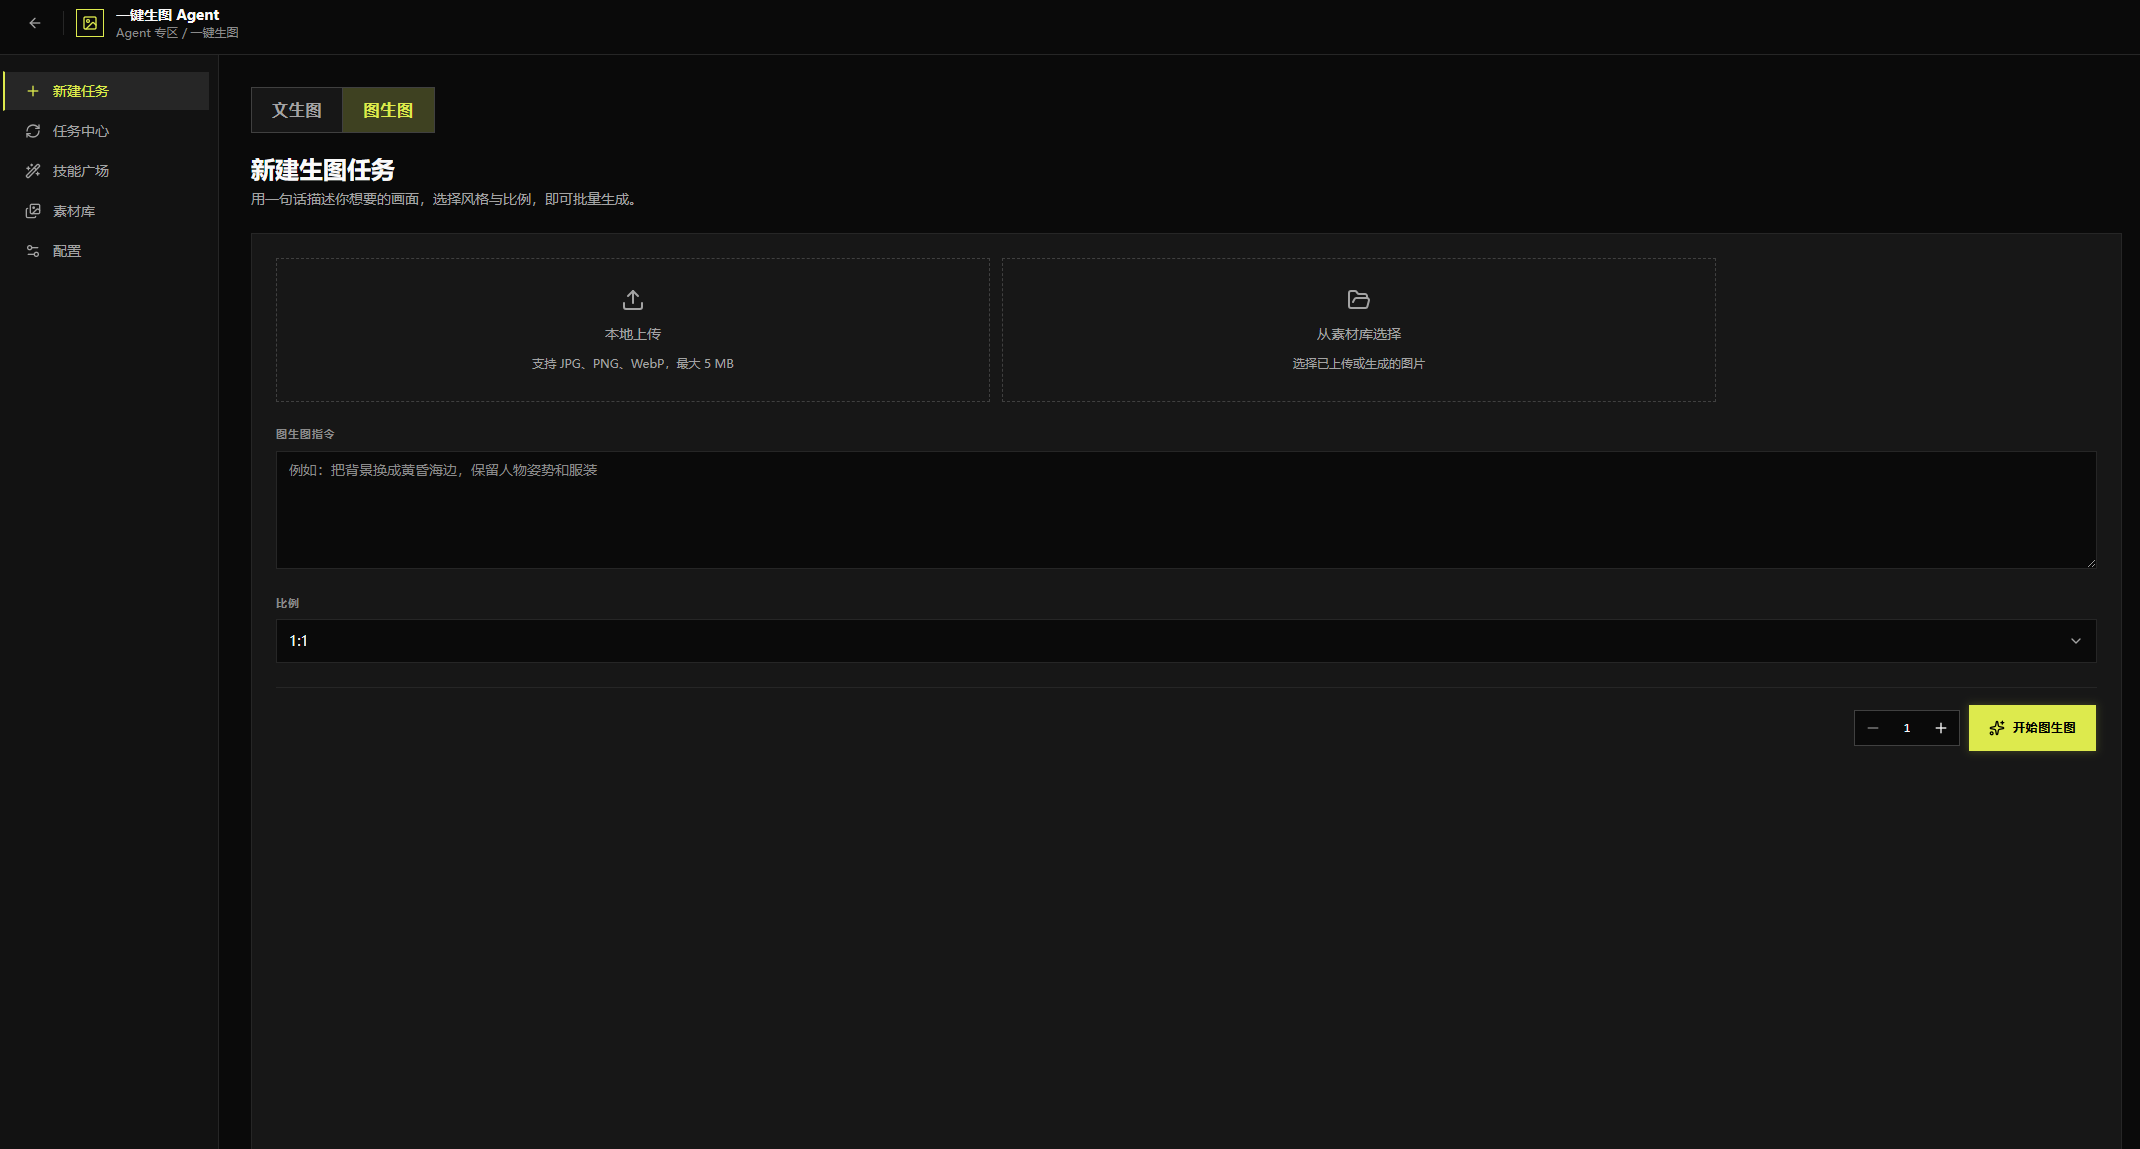
Image-to-Image: create with AI from an existing image. Switch to the Image-to-Image tab, then:
- Upload a reference image (choose one): upload from local (JPG, PNG, WebP; up to 5 MB each) or select from the Material Library.
- Enter your instruction, e.g., “Change the background to a beach at dusk, keep the pose and outfit.”
- Select the output ratio (default 1:1).
- Set the batch count with −/+ (default 1 image).
- Click Start Image-to-Image; the system generates results in batch, and you can track progress and outputs in the Task Center.

Step 3: Track progress and view results
After generating, check progress in the Recent Tasks panel on the right, or open the Task Center menu.

Task Center
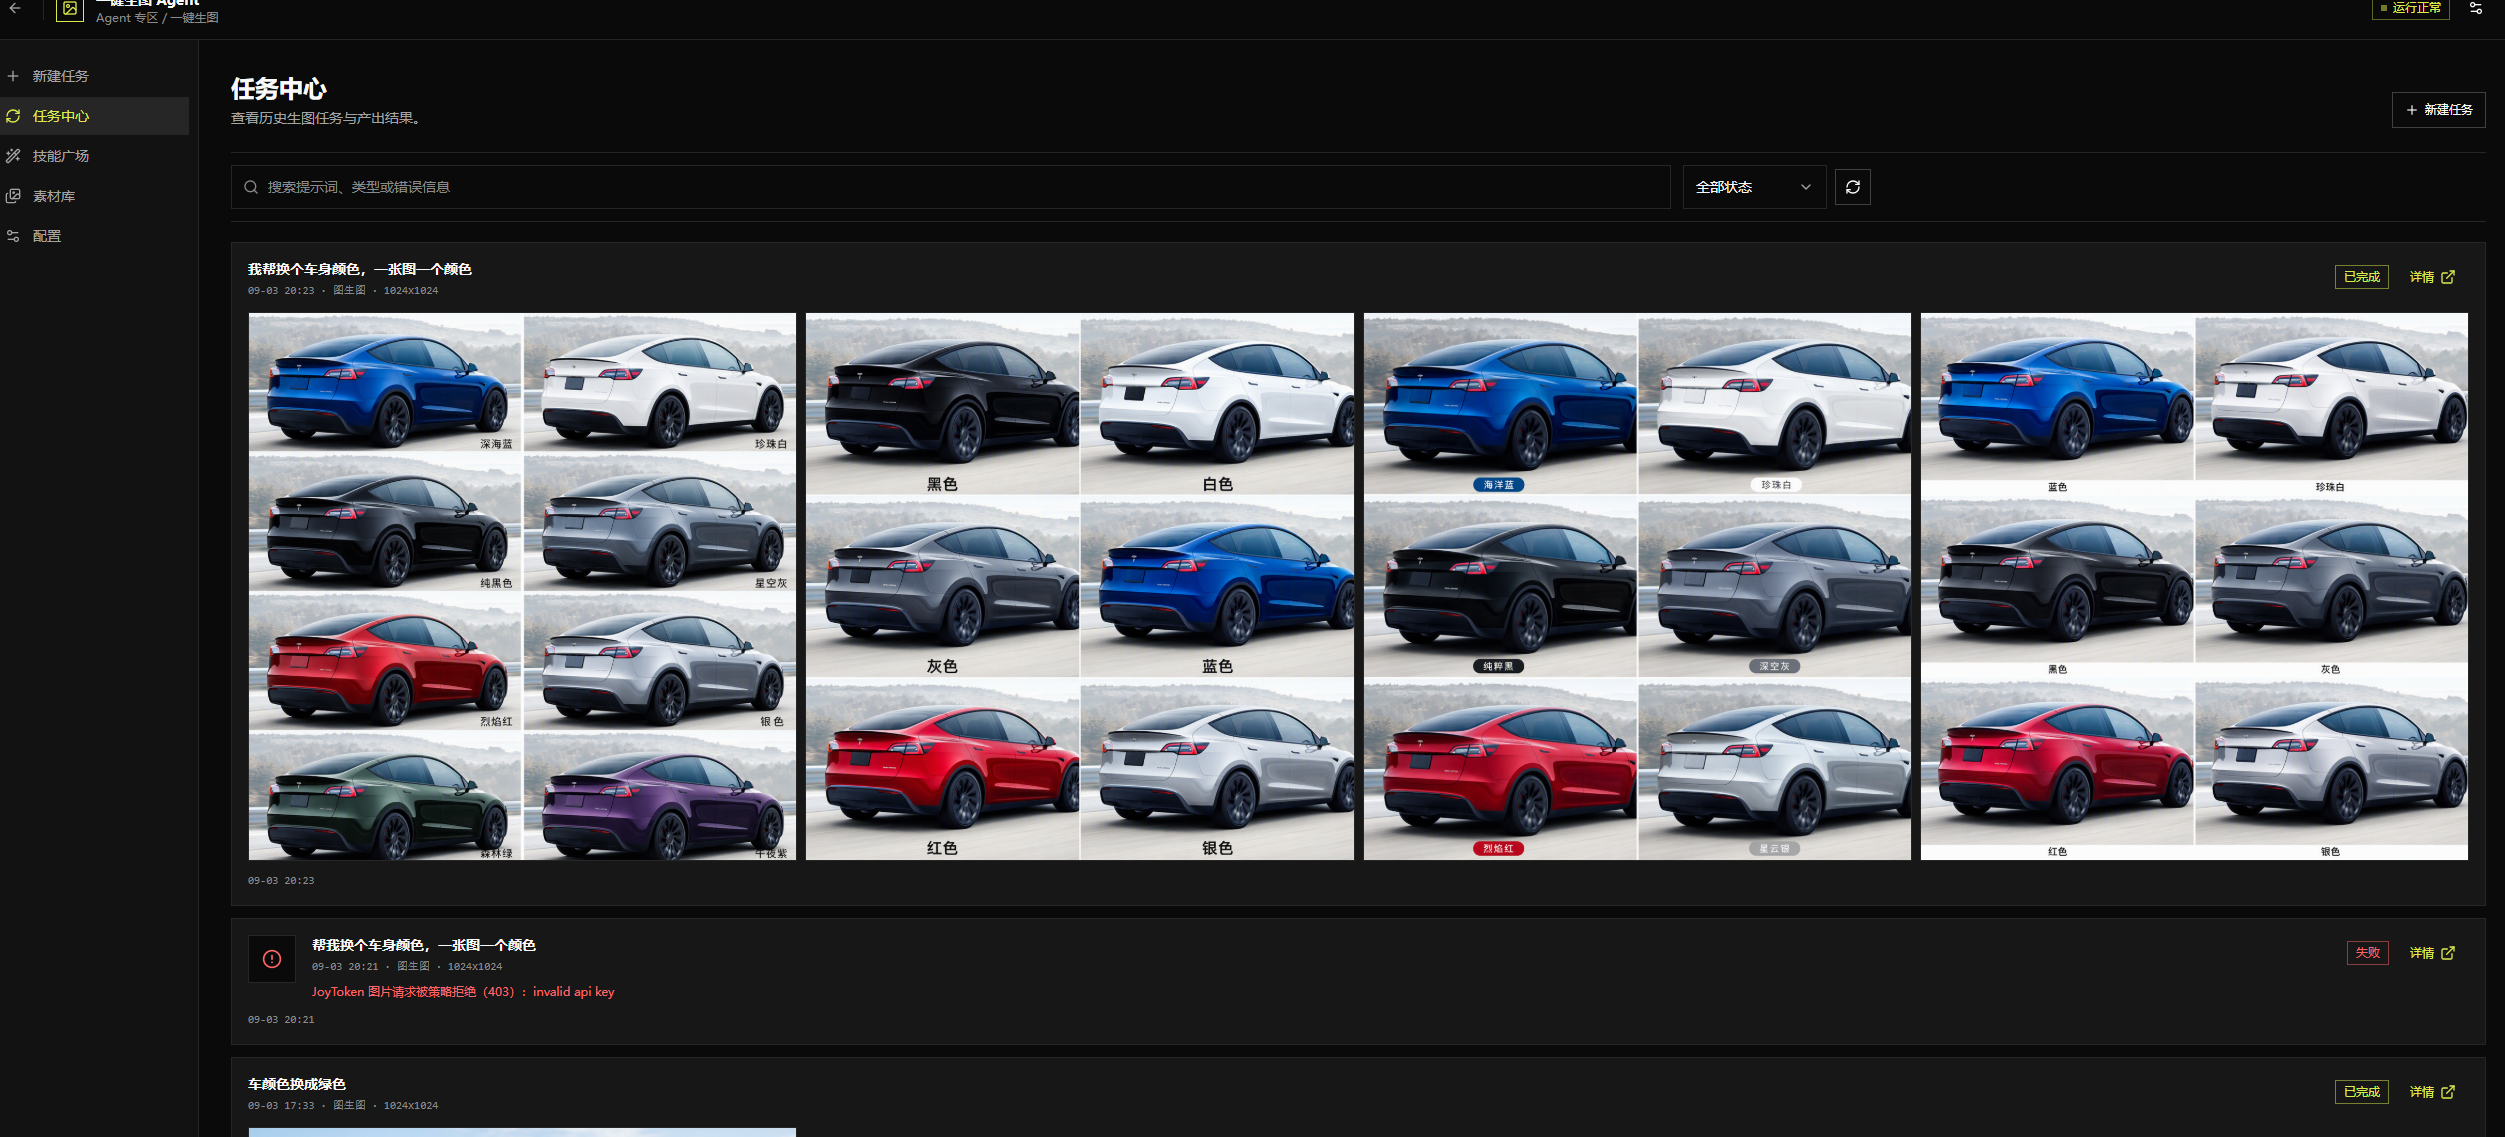
The Task Center reviews historical generation tasks and their outputs, centrally managing all Text-to-Image / Image-to-Image tasks. It shows task status, generation time, image size, and output images, and supports search, status filtering, and refresh.
Interface:
- Search bar: search history by prompt, type, or error message.
- Status filter: the top-right dropdown filters by “All statuses” and more (e.g., Completed, Failed).
- Refresh button: manually refresh the latest status of the task list.
- New Task: a top-right shortcut that jumps to creating a new generation task.
- Task cards: each task shows the prompt, generation time, type, size (e.g., 1024×1024), a status tag, and thumbnails of the outputs; Details on the right opens the full result.
Statuses: Completed (green) means success and shows the batch of result images; Failed (red) means the task did not succeed and displays the error reason.

Task Details
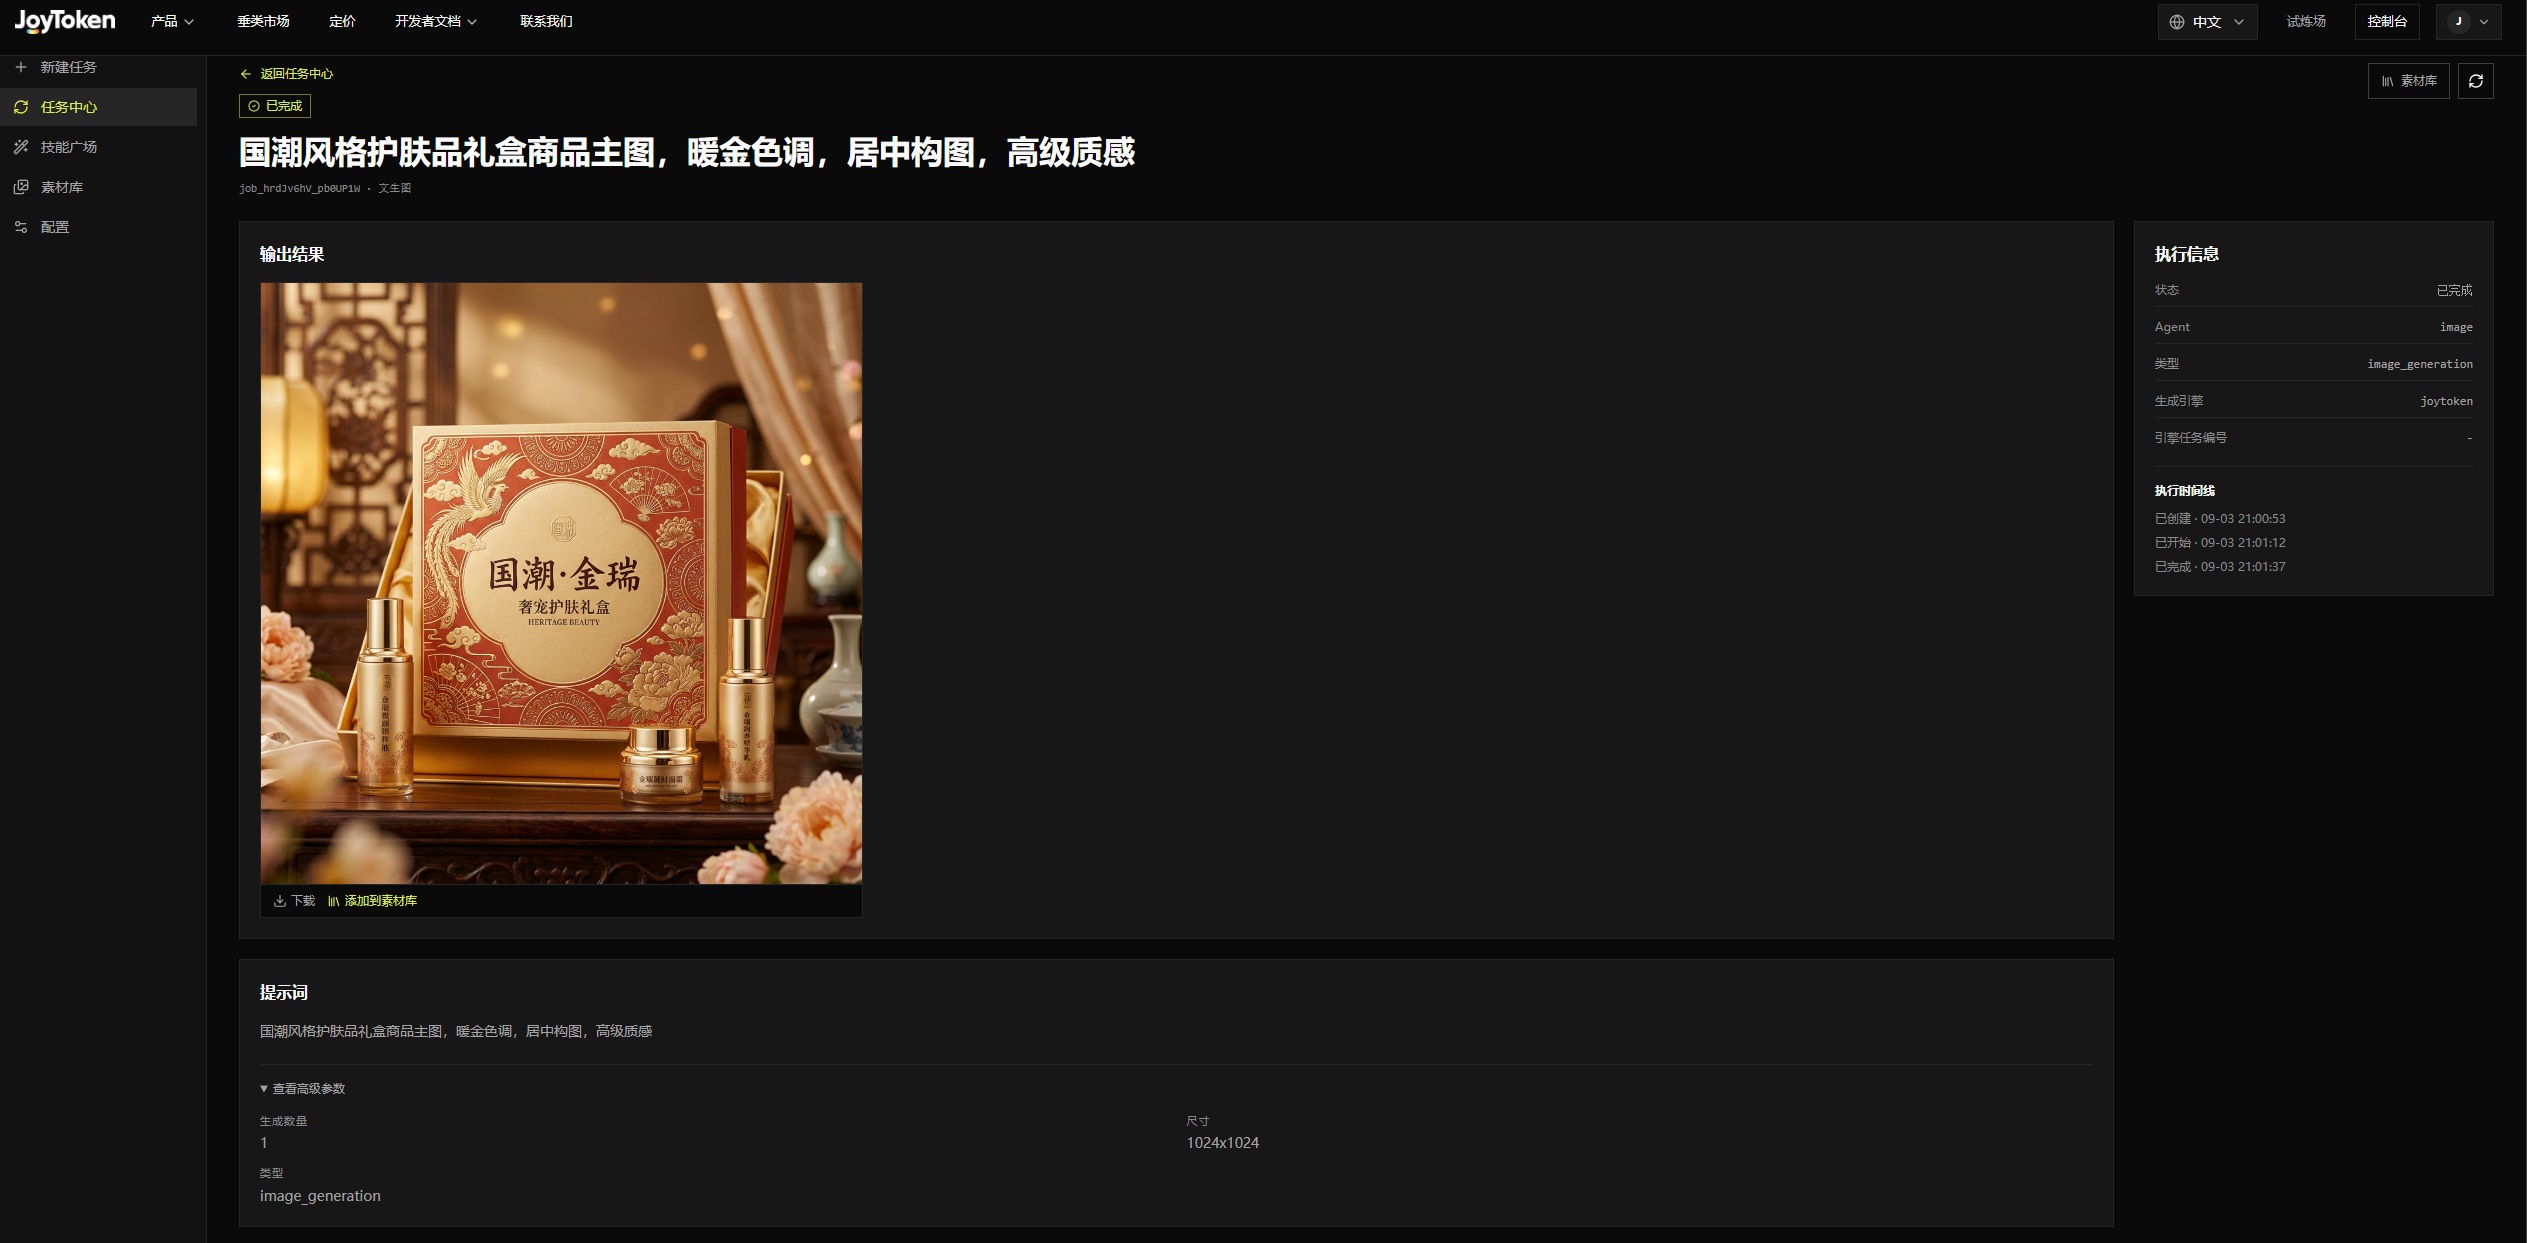
The Task Details page shows the full information of a single generation task — output results, prompt, execution info, and advanced parameters — for viewing generated images, downloading/saving or reusing assets, and tracing the execution process.
Sections:
- Output results: the finished images, each with Download (save locally) and Add to Material Library (for later reuse).
- Execution info (right panel): status, Agent (image), type, generation engine, engine task ID, and the execution timeline (Created / Started / Completed timestamps).
- Prompt: the full prompt text used for this generation.
- View advanced parameters: expand to see the count, size, type, and other detailed settings.

Material Library
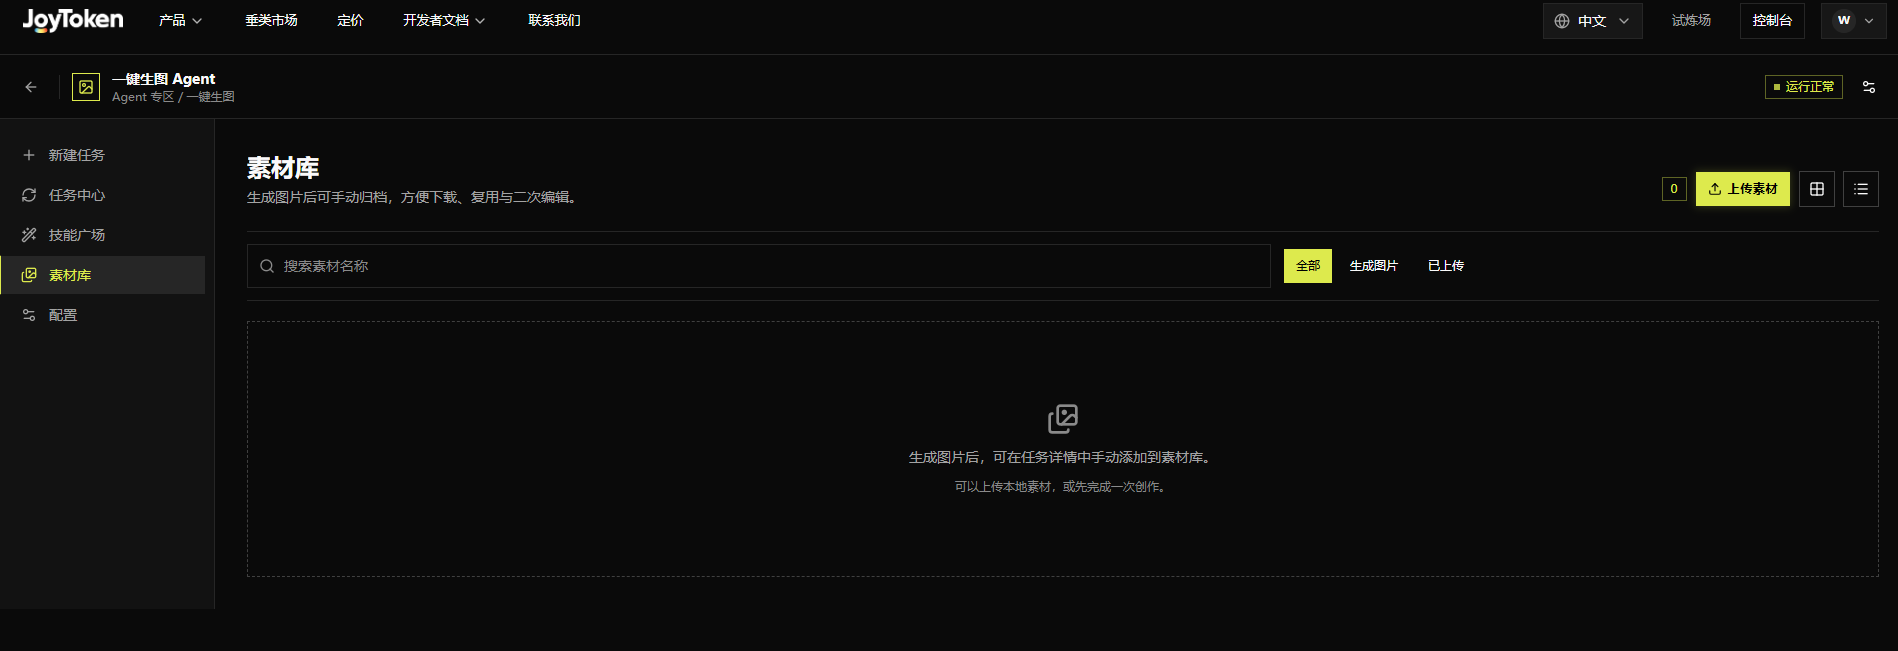
The Material Library archives and manages image assets in one place. After generating images you can manually archive them here for easy download, reuse, and re-editing (e.g., as a reference image for Image-to-Image); uploading local assets is also supported.
Interface: a search bar (search by name), category filter (All / Generated / Uploaded), an Upload button, an asset count, and a grid/list view toggle.
Sources: Generated (results archived via “Add to Material Library” on the Task Details page); Uploaded (local images added via the Upload button).

Skill Plaza
Overview
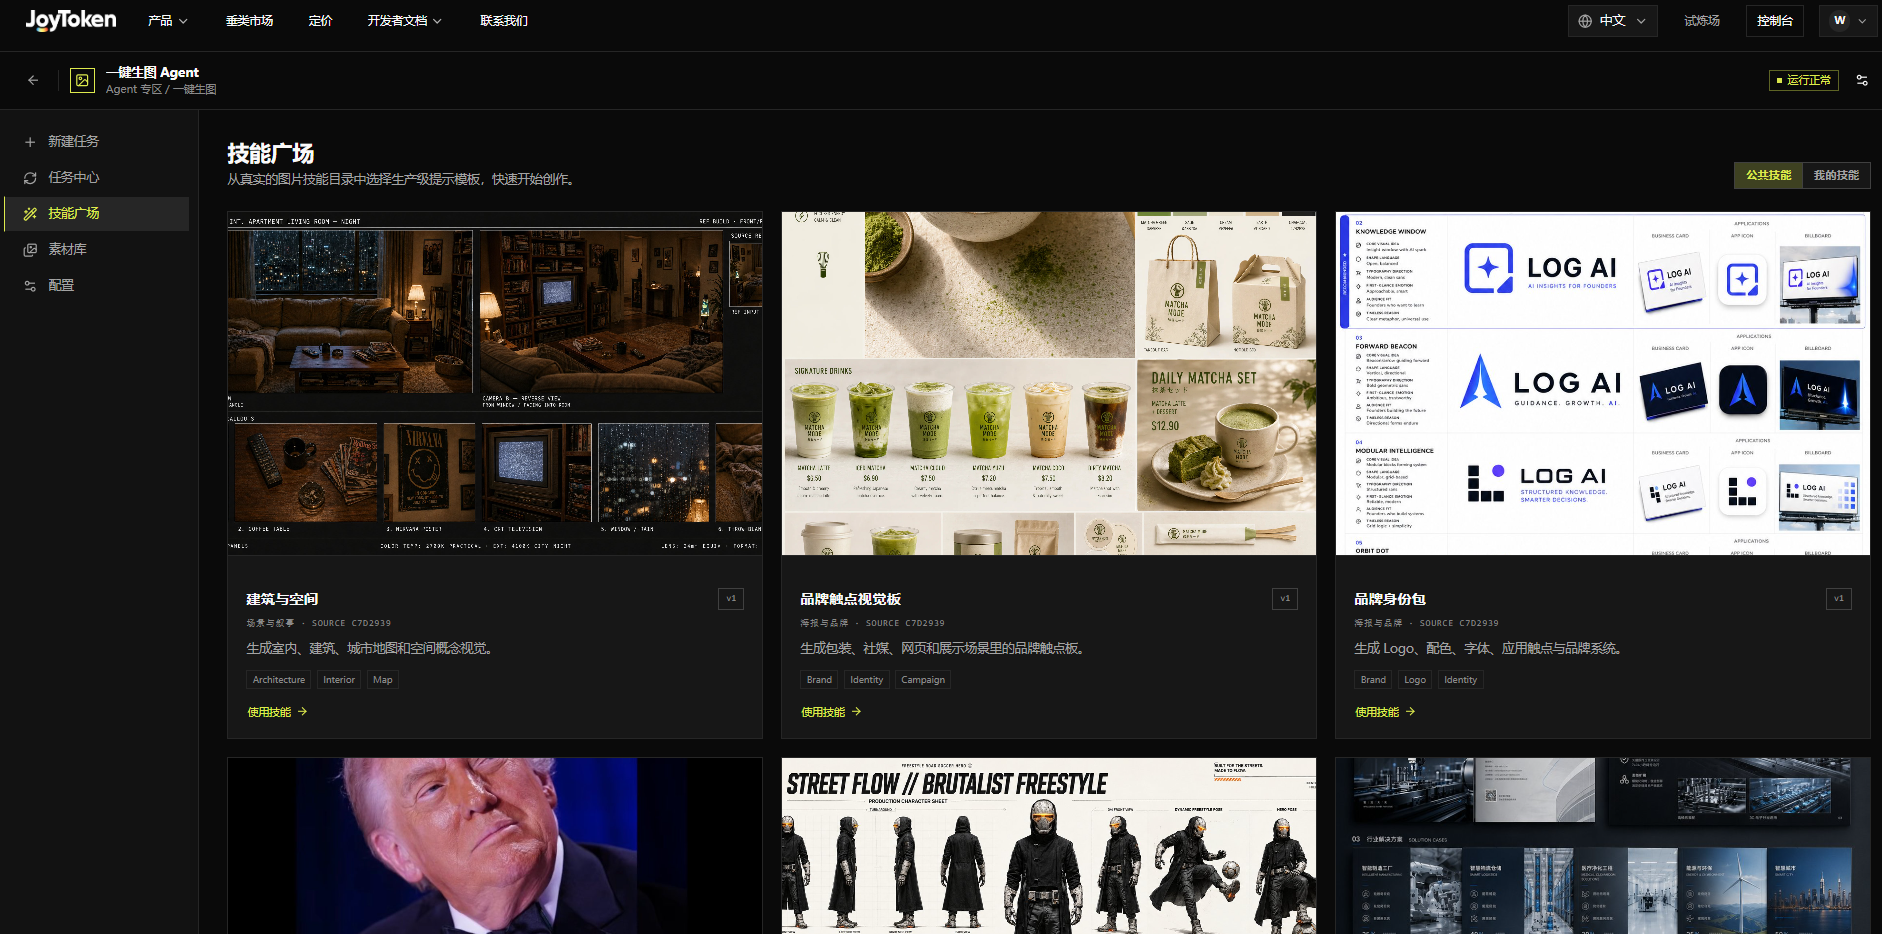
The Skill Plaza is the core entry point of the Text-to-Image Agent, providing production-ready image prompt templates (skills). Pick a template from the real image-skill catalog and start creating quickly.
Public Skills
Preset templates are shown as cards, each with: a preview image, name, category source (SOURCE ID), version (v1), description, tags, and a Use Skill → button. Example templates:
- Architecture & Space: generate interior, architecture, city-map, and spatial-concept visuals (tags Architecture / Interior / Map)
- Brand Touchpoint Moodboard: generate brand touchpoint boards for packaging, social, web, and display scenes (tags Brand / Identity / Campaign)
- Brand Identity Kit: generate logos, color palettes, typography, application touchpoints, and brand systems (tags Brand / Logo / Identity)

Using a Skill
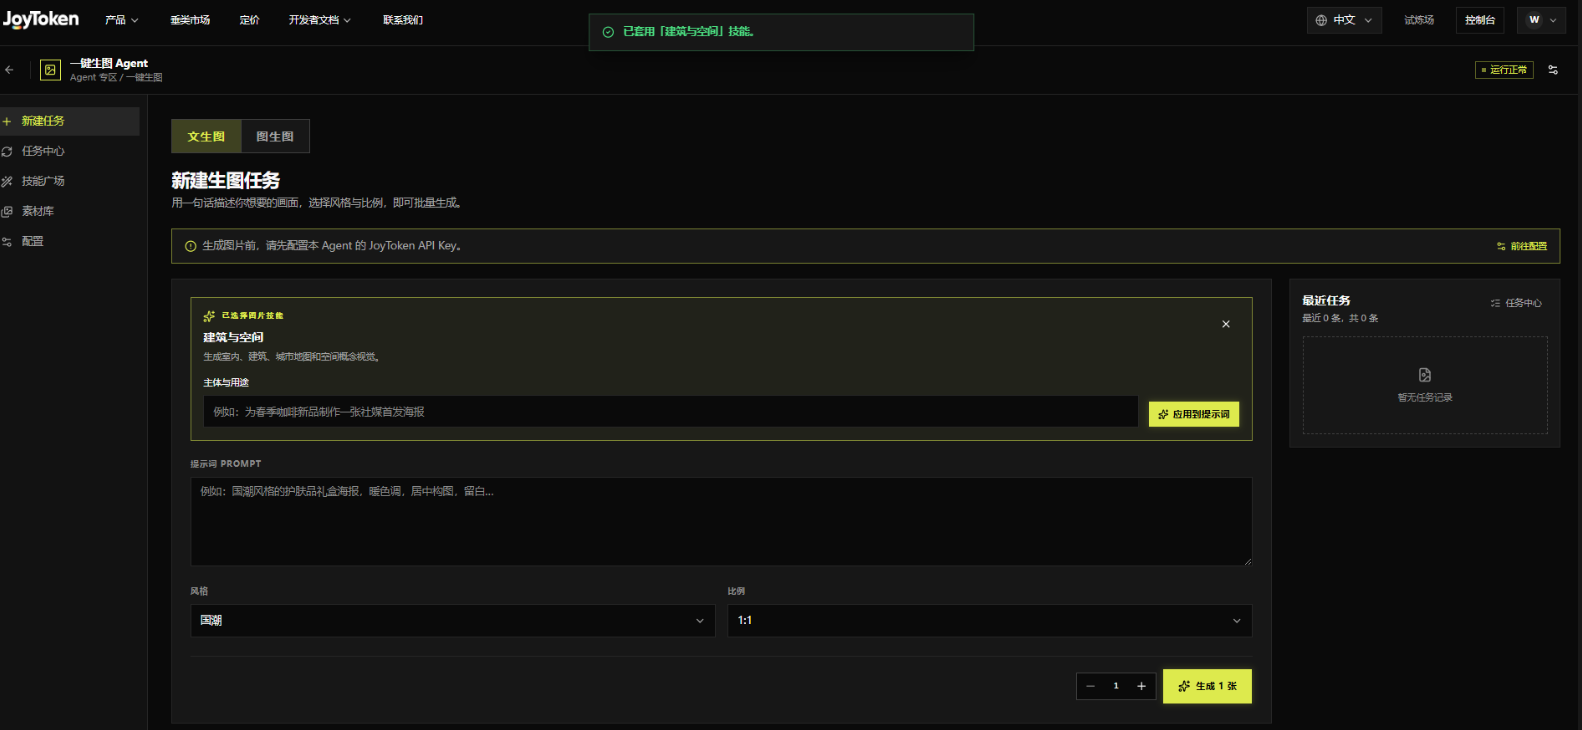
After clicking Use Skill → in the Skill Plaza, the page jumps to New Task - New Image Task, with a note at the top: “Applied the ‘Architecture & Space’ skill.”
Selected image-skill area (using the selected “Architecture & Space” as an example):
- Shows the skill name and description
- A subject & purpose input box (e.g., “Create a social-media launch poster for a new spring coffee product”)
- Apply to prompt button: combines the subject/purpose with the skill template and fills the prompt
- The × in the top-right cancels the selected skill
The remaining steps follow the same Text-to-Image Agent flow.

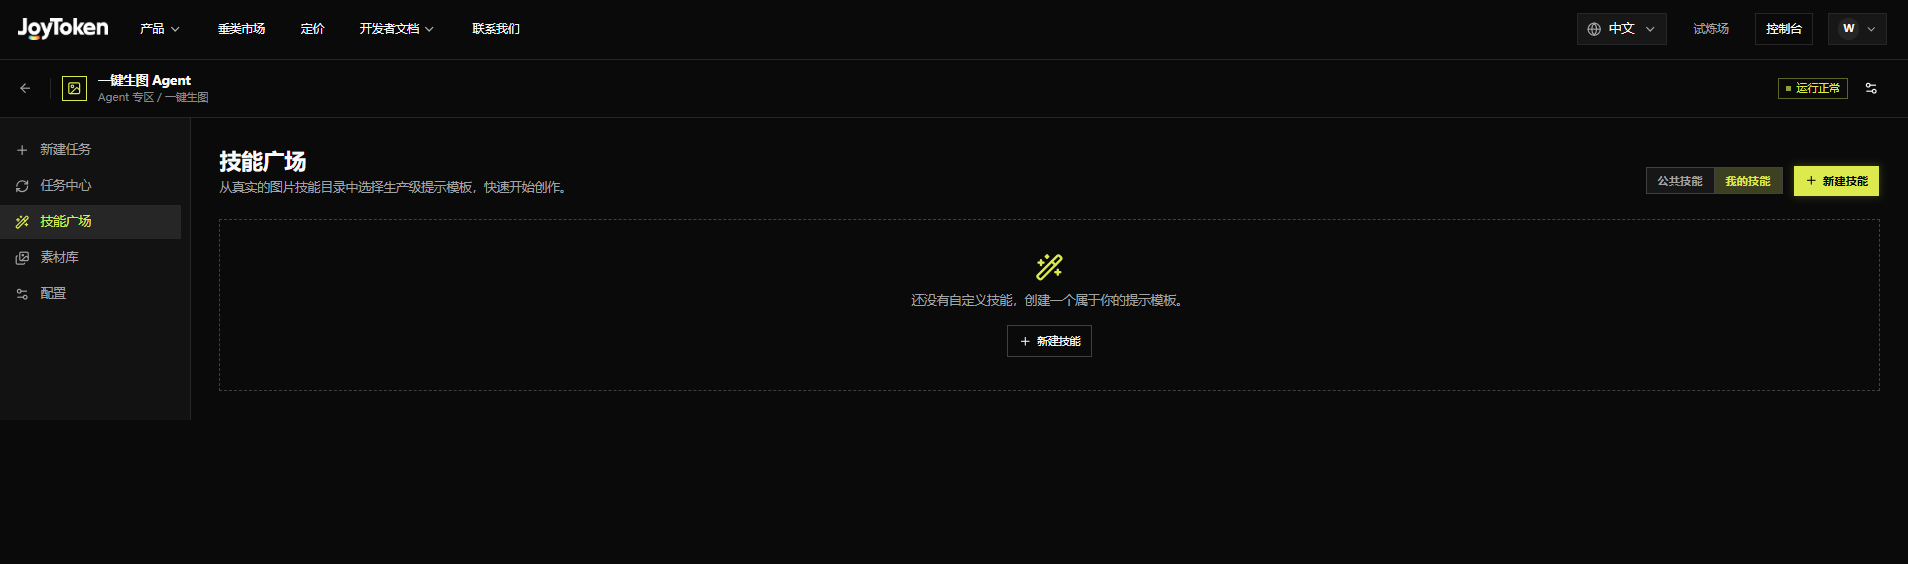
My Skills
Shows user-created templates; when empty it prompts “You don’t have any custom skills yet,” and you can click + New Skill to create one.
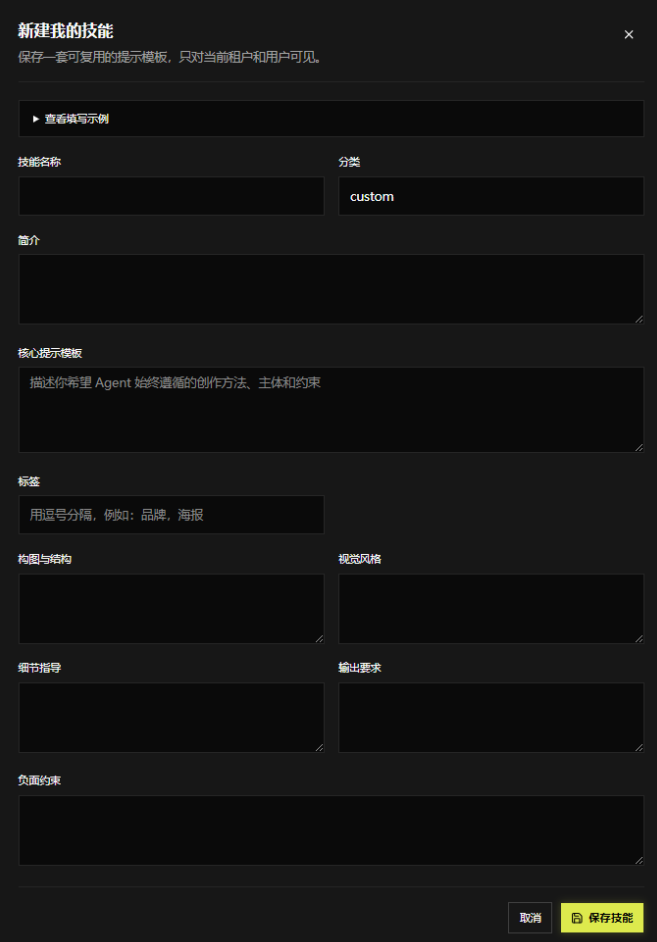
Clicking + New Skill under My Skills opens this dialog, used to save a reusable prompt template. The skill is visible only to the current tenant and user. A ▶ View filling example toggle at the top expands a reference example.

Field descriptions
- Skill name: the name of your custom skill
- Category: the skill’s category, default: custom
- Description: a brief note on what the skill is for
- Core prompt template: describe the approach, subject, and constraints you always want the Agent to follow (the core required content)
- Tags: comma-separated, e.g., “brand, poster,” for easier searching and categorization
- Composition & structure: constraints on composition and structure
- Visual style: overall visual-style requirements
- Detail guidance: guidance at the image-detail level
- Output requirements: output-spec requirements for the results
- Negative constraints: elements or effects you don’t want (negative prompt)
Buttons
- Save Skill: save and create a custom skill, shown in the My Skills list
- Cancel: discard input and close the dialog
- × (top-right): close the dialog
Steps
- Click + New Skill under My Skills to open the dialog
- (Optional) Click View filling example for the format
- Fill in the skill name, category, and description
- Enter the approach, subject, and constraints in Core prompt template
- Add tags, composition & structure, visual style, detail guidance, output requirements, and negative constraints as needed
- Click Save Skill to finish; you can then apply it when creating a new task